 So,here is my result for in-class exercise tutorial 6.
Below are some steps that i use in the making of the last tutorial.
Some shapshot during the making of tutorial 6.
Step 1:
 I dragged the picture of a background and paste it on the
basic layer given from the tutorial 6 achieve's fille.

 Next,i make new layer and click CTRL+Backspace to fill the new layer.
Then,i applied Filter>Render>Fiber to the new layer.
 After that,i change the blending option to Overlay to blend the layer.
Step 2:
 Next step,i use Filter>Render>Lighting Effects
and choose Flashlight to add an effect on my layer.
Step 3:
 Here,i created a new alpha layer and to Edit Menu>Stroke.
 I applied Gaussian Blur to the layer and then duplicated
the alpha channel and i made an offset to both layer.
 Here,i use Image>Calculation>Different.
 Then, i use the M Curve to make it chrome.
Step 4:
 Now,i dragged the picture of the Joker from the Dark Knight movie and applied a Hue/Saturation on the layer to make it grayscale.
 Next,i applied Gaussian Blur to the layer.
 Then,i add some change using the Levels tool.
 Again,i use the M curve to chromed the layer.
Step 5:
 I use Blending Mode>Different again to this layer.Then, i make a new selection and add vector mask to the selected layer.
 Now,i again applied the Hue/Saturation and choose Colourize
to make the Seventies's layer same as the background colour.
 After that,i make a new layer and select it using marquee tool and fill it with white colour using CTRL+Backspace.Then,i use Filter>Render>Lighting effects(Flashlight) to the selected layer.
 Lastly,i overlayed the layer and blend it well using the Blending Option tool.
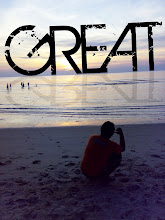
So,this is the final result of my last tutorial.
-Med.tJ
No comments:
Post a Comment